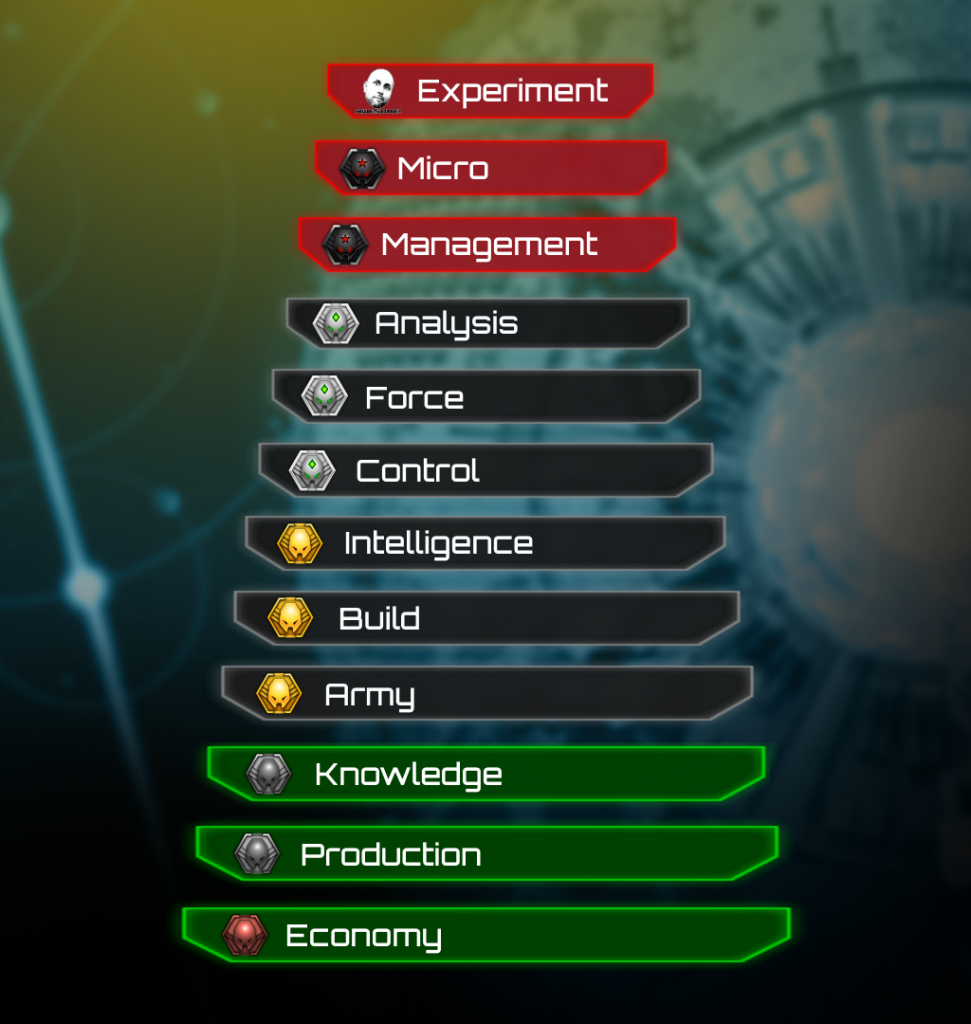
Thanks to Budha for his Starcraft pyramid which was the inspiration for this guide.
The Planetary Annihilation Skills Pyramid is intended as a structured guide to improving your skills; these are all areas you should focus on mastering to improve your game. The order is my take on how key they are to playing the game and how far they can take you. Focus on working your way up the Skills Pyramid as you would the ladder and no matter where you rank you should see progress.
One way in which Planetary Annihilation differs a lot from Starcraft is that it doesn’t use the UI as a means to limit what a player can and cannot do. I strongly encourage you to check out mods to discover those which help unleash your potential.
While reading through this guide be mindful of the three golden rules of Planetary Annihilation:
Grow it – always be expanding your economy
Spend it – always be expanding your production
Use it – always be harassing the enemy’s economy
Economy
The most basic of all basic things, the economy is the base of your entire game. Forget any clever tricks, epic battles or superweapons; without a good economy you won’t manage to do anything except die like a turtle holding a tiny amount of land.
This step comes down simply to being greedy: always want more than you have. You don’t need to expand above all else since if you can’t spend it then it’s a wasted investment, but an economy without an army will lose. Never stop and wall yourself in like you’re playing tower defence. In a 1v1 half of the metal on the battlefield is yours, so go and take it. If you don’t have at least one or two fabbers working on your economy then the chances are you’re doing something wrong. Just be careful not to build an economy whose only purpose is to support more fabbers which build an economy to support more fabbers…
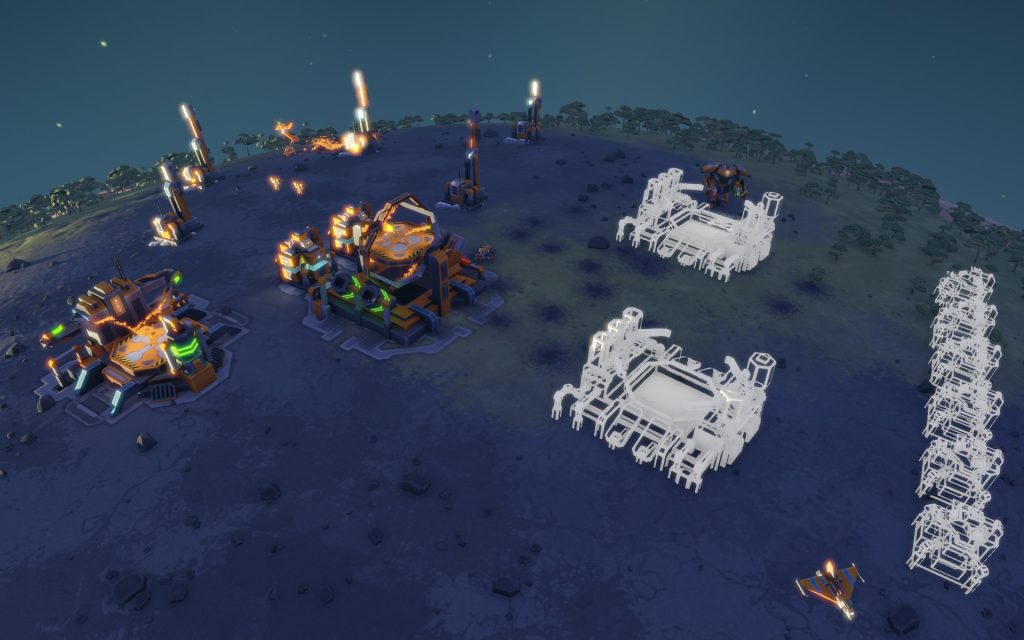
Production
All that money you’re making from your economy is no good if you’re not spending it.
This is a sign you could have had more troops
A typical trap that people fall into with production is the same as their economy: getting comfortable. You have five factories all producing troops, it looks cool and you’re good to go, right? Wrong. The creation of factories is never ending so long as you’re able to increase your income. You should never be in the red, nor in the blue, but always in the green.
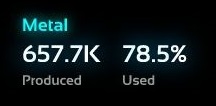
Pay attention to the metal used stats at the end of a game. Good players keep this above 90%, and the best players keep it around 100%. Just make sure you don’t confuse constant economy stalling with good play, so check your build efficiency too.
The Commander is a unit best used for producing factories, not economic structures. Minimise walk time between builds to maximise army size. You’ll win games simply by having more units than they do.
Knowledge
It’s not enough to simply be making units, they have to be the right units, which means knowing the meta. The easiest way to see what’s what is by checking out replays from higher level players and seeing what they do for each map through the leaderboard replays.
Take it to the next stage by not only copying, but also understanding. So you can see their attack force on Forge was primarily Ants, but why? For this you can dig a little deeper by following discussions on the PA forums, the #strategy channel in the Planetary Annihilation Discord and Community Chat.
Army
With knowledge you know what to put in your army, but at this level you know where to put it as well. Before you would have troops pouring out the factory before lassoing them for battle. At this level you’re smarter than that, your rally points more considered.
If the metal is between you and the enemy then you might be rallying your troops there to hold it for your fabber. A choke into your base makes a good point to position the troops and prevent raids. You don’t place your bombers on the frontlines where they can be sniped by fighters, they’re held a little further back.
You’re not mindlessly adhering to the meta, rather your composition is adjusted on the fly. If you’re dominating the skies then you switch to Bumblebees. If you’re vulnerable to the same then you start bringing out Spinners, but if you haven’t sighted air then you replace those Spinners with additional Ants. A map with lots of chokes brings out mass Ants, while dispersed metal sees you making Dox raids and keeping your opponent on their toes.
Build
Build orders are the cornerstone of any RTS, whether it’s a micro or macro focused one. Some people hate them, but there’s no avoiding them. Until you encounter the enemy there’s no reason to deviate from your plan, and you should have a plan before you spawn.
Build orders change and evolve over time and most if not all the ones you use won’t be yours, they’ll come from someone near the top of the ladder. But that’s not a bad thing, it means they’ve been tried and tested and shown to work. You simply need to choose the right one, implement it effectively and once you encounter the enemy you’ll get to show what a special snowflake you are.
Intelligence
Insert some Sun Tzu quotes here because this is where we’re going to talk about the importance of both scouting your enemy, but also denying the enemy intelligence on your operations. If you know their plan before they carry it out then you can counter it, and likewise you should be maintaining the element of surprise for as long as possible and preventing your opponent from scouting you.
There is no scouting phase; the time for scouting is always. You want to know where their base is, what force composition they’re building towards, where their armies are, when they’re teching and whether they’re leaving the planet. With intelligence you can act – without it you are fumbling in the dark and you will lose.
There is no scouting phase; the time for scouting is always.
Learn what radar blips mean. Are they moving at the speed of air or ground? How closely are they packed? How far off the ground are they? Little details like this will tell you so much about the threat before you even see it.
Take out the enemy’s radar before a major attack and instead of encountering their army you might find a series of unprotected factories and energy plants.
Win the intelligence war and you can win the game.
Control
At this point you need to do more than simply know what your opponent is planning and react to it, you need to be defining the game. Map control is a vital part of ensuring that the enemy is dancing to your tune.
Identify the key expansion points and deny them to your opponent. Find the chokes and set up shop. Know when it’s time to stop building the mega base and instead roll the commander out to own the middle ground.
The important thing is to ensure that fights are happening on your terms. By owning the map you force your opponent’s hand and they have to bring the battle to a place of your choosing.
Force
The application of force is a key part of overwhelming your opponent and giving them too much to handle. Dox raiding their MEX, Inferno’s dropping in at the rear and an Ant army rolling towards the front door.
Remember that attention is a resource, so divide your opponent’s and take advantage of their weakness. Even if your attention can’t be everywhere you can set up orders that will be. You don’t need to personally oversee that Dox raid, just put enough numbers in the group that they will kill any MEX just by walking by. Set up queues at your base so you can manage your army without falling behind.
Remember that attention is a resource.
Don’t do more than you’re able. Your attention is also a resource, one you must budget accordingly. Prioritise the areas which receive your attention to maximise your effectiveness.
If you haven’t already made it your business to step through every entry on the keyboard settings page and ensure you’ve memorised every hotkey that looks even vaguely useful. Now is the time.
Analysis
Winning is all well and good, but losing should be turned to your advantage too. Always analyse your games for ways to improve. Did you win because you were better or because your opponent was worse? What was the reason you lost and how will you avoid it next time? Take advantage of the fact that the game allows you to access the last 30 days of games for every player.
Don’t make excuses, make improvements to your game.
Look over the stats, identify your deficiencies. In a game where everyone has the same toolset a loss means you did something wrong. Find the turning point in the game and figure out what caused it to happen. If it’s a map you’ll see again, how have other players tackled it? More units than you means you should analyse their economy. More economy means you should analyse their build.
Don’t make excuses, make improvements to your game. Some players will even stay after a game to discuss it with you, so make sure you’re polite and take full advantage of their generosity. You will become a better player for it.
Management
One of the major differences between a player at this level and others is the omnipotence factor, the feeling that they’re everywhere at once. No matter where you attack they are there to counter. No matter how many fronts you’re fighting on they can manage them all.
At this level you should be in complete control of your game, able to handle all the battlefields. Whether you achieve this through camera anchors or just fast panning doesn’t matter. You’re not overwhelmed by the information. You’re using middle mouse button to move the camera because you need WSAD for the army of hotkeys you use. Whether it’s ensuring you have no idle factories or summoning your air force, you have a key for it.
More than that though it’s about keeping your cool. You don’t panic when something sweeps in from the fog of war, instead you calmly divert troops while also ensuring continued production and managing your own assault on their base and the raiding party you have around the back.
Thinking about how to counter something never happens because you already know what to do. This level of skill is difficult to gain through anything other than experience, but it won’t be obtained without making full use of the options the interface provides for you.
Micro
The stuff everyone loves to see, but it’s an especially small part of Planetary Annihilation. Yet when all other things are equal it is this that can make the difference and you will see top players micro alot.
In Planetary Annihilation micro will take the form of dancing Dox to avoid fire, maximising your Bumblebee damage through floating and formation runs, keeping Ants at range and guiding Booms to their glorious demise. But until you master everything else on the list you shouldn’t waste your time. These are all time-intensive tasks and you will need to be comfortable in your game management to pull them off.
If micro is harming any other part of your game then the micro was probably a mistake.
Experiment
This is what separates those top few from everyone else. That opening you use because, duh, that’s how you play this map? Well there was a time it didn’t exist. Some top player was testing out new builds, running the numbers, seeing what worked and what didn’t. It was so effective that everyone adopted it.
It’s not enough to do what everyone else does, you need to be ahead of the curve, surprising your opponent in ways they don’t expect. To become the best you have to put the time in. You need to be willing to try things outside the established meta if you want to surprise your opponents and win tournaments. It won’t be random either, at this level you have an intuitive understanding of the game which will guide you in what to try.
When you’re defining what the game is that’s when you know you’re among the awesome tier.
This tutorial will walk you through the in-game interface, the controls, what it all means and how you can customise it. The focus will very much be on elements unique to Planetary Annihilation.
When this tutorial refers to “clicking” without referencing a mouse button, assume the primary/left mouse button.
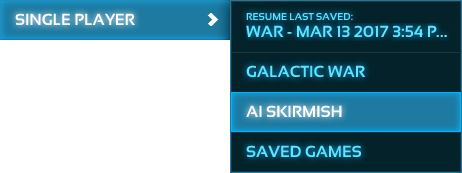
Setting Up A Game
Multiplayer games of Planetary Annihilation are hosted on a server in the host’s selected region. You will be prompted to select a region the first time you host a game. Multiplayer games are not hosted on your computer. Planetary Annihilation uses a client-server model, so a player’s computer and Internet connection do not impact other players.
Single-player games may be hosted on your computer or one of the cloud servers, depending on the specifications of your machine. You can force local or remote hosting if desired. See the Local Server setting in the Global Game Settings of the guide for more information.
Uploading Server Mods
If you are using any server mods and hosting a multiplayer game, or your computer isn’t powerful enough to host a local server for skirmishes, you will automatically upload them to your cloud server as an anti-cheat mechanism. The speed at which this occurs is dependent on your upstream bandwidth and the size of the mods.
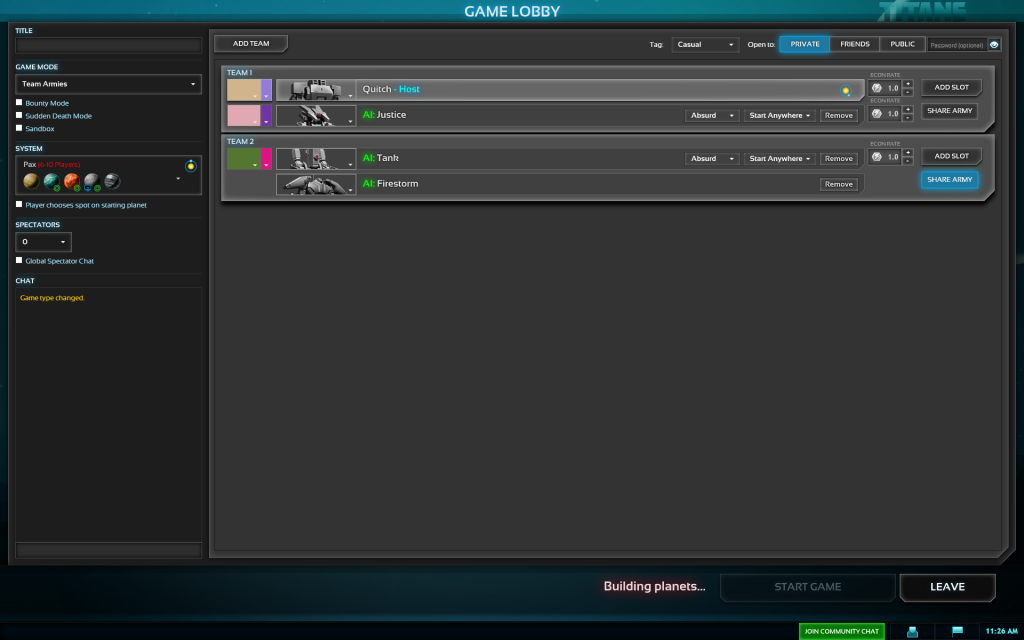
The Lobby
The individual who creates a lobby will be known as the host. Only the host can change a lobby’s settings. If a host leaves the lobby a new host is selected based on who has been in the lobby the longest.
Each colour represents one army. Player count recommendations for maps are actually army count recommendations.
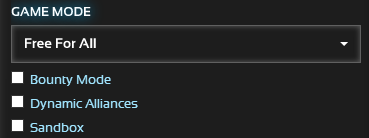
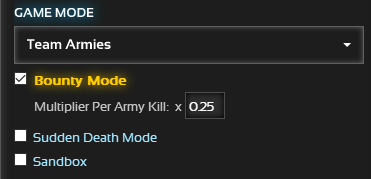
Game Mode can be set to Free For All or Team Armies.
Free For All means every player is their own army.
Team Armies places each army into a team. In this mode there is a second option: share army. It is a button on the right-side of each army. When clicked all the players in that team become a single army, with as many Commanders as there are players. The army is only defeated once all its Commanders are killed. Beware using the “select Commander” hotkey in this mode as it will select all Commanders on the team. Humans and AIs cannot exist together within a shared army.
Dynamic Alliances allows you to ally (and un-ally) during the course of a game with other players. Breaking an alliance with someone breaks it both ways. You cannot see alliances between other players. This option is only available when game mode is set to Free For All. The AI will never propose or accept an alliance.
Sudden Death Mode means a team is eliminated when it loses any of its Commanders. It is only available when the game mode is set to Team Armies.
Bounty Mode enables an eco boost for every army killed. If an team is a shared army you must kill the last Commander in that army to claim the bonus. When the last Commander on an army self-destructs the bounty goes to the last player who damaged it.
Sandbox enables the use of dev options such as unit spawning. Controls for this can be found under Settings – Keyboard – Dev.
To the right of each army is its economic multiplier. By default this is set to 1.0. Changing it to 0.5 would give an army 50% of their normal income while setting it to 2.0 would give it 200%. You can set this anywhere from 0 to 5, both for players and the AI.
You can create new systems for use in the System Editor from the main menu, there are also map packs available via Community Mods.
When you load a system, or when first joining a lobby, you will see a rotating graphic in the system area as well as next to your name. Only when both these loading icons have disappeared will you be able to start the game, or select ready. When players join your game they will be greyed out while they load and you will see the loading icon on their row.
Only the host can launch a game, and they can only do so once every player has clicked the ready button. Once they have done this a green tick appears on their row. Any changes to the lobby’s settings by the host removes the ready state from all the players. When you are in a ready state you cannot make any changes to your setup.
You can change your primary colour and also which Commander you will spawn in as by left-clicking. Set your default commander through the Armory on the main menu. Some Commanders may be unavailable to you.
The host can add one or more AIs in the lobby. AIs on your team are supported, but not in shared army mode, nor will the AI use or respond to dynamic alliances.
AI difficulty controls how well they manage their economy, their micro level, which player it focuses attacks on, and how smart its threat decision making is. The AI doesn’t cheat at any difficulty level, though you can assign it an eco boost if you so desire. There are also mods which make the AI even tougher.
Once you have your lobby setup, change the top-right setting from PRIVATE to either FRIENDS or PUBLIC depending on who you want to join. FRIENDS is tied to your in-game friends list, not your Steam friends.
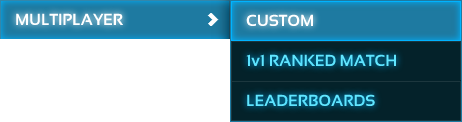
Joining A Game
Multiplayer – Custom Game will take you to the server browser. From here select the game you wish to join and click Join Game in the bottom right-hand corner.
When joining a game with server mods you will automatically download them from the server. The speed at which this occurs is dependent on your downstream bandwidth and the size of the mods.
The Basics
Spawning
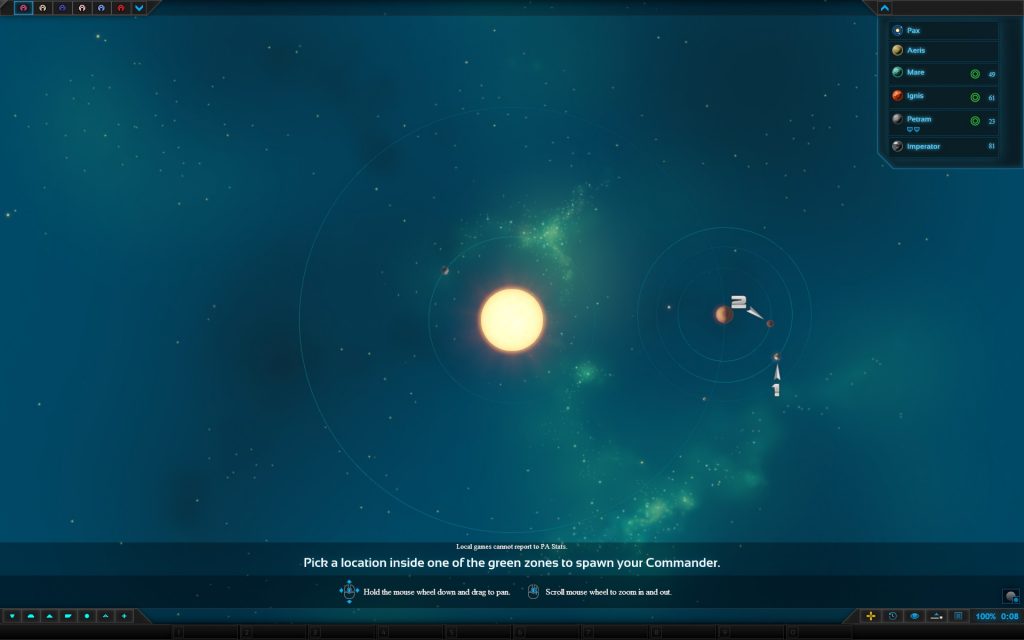
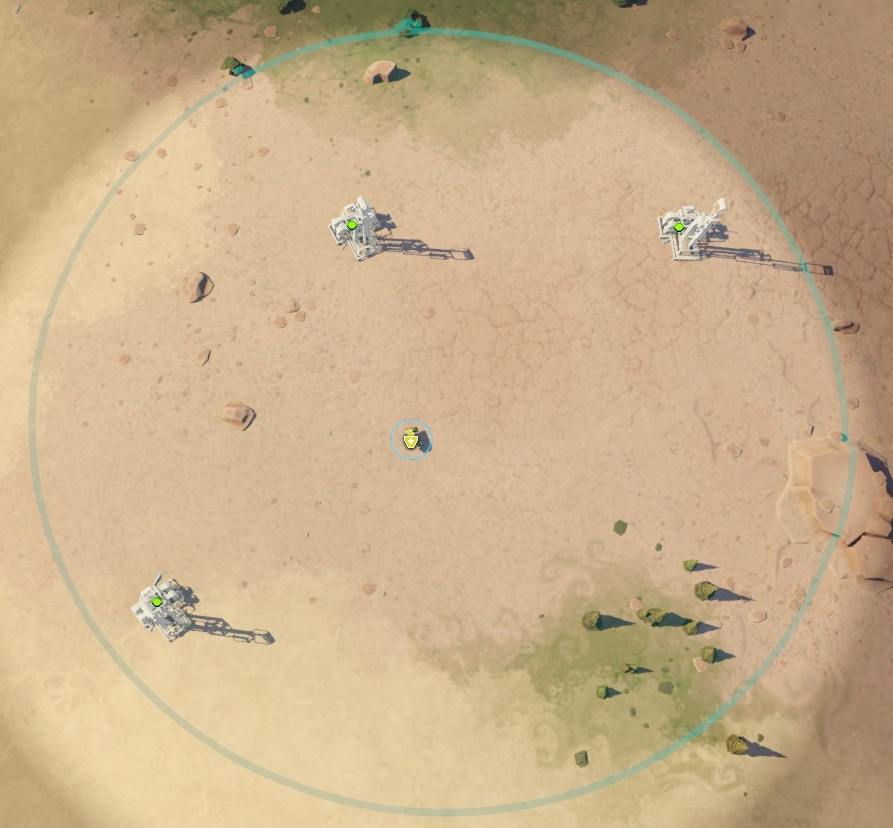
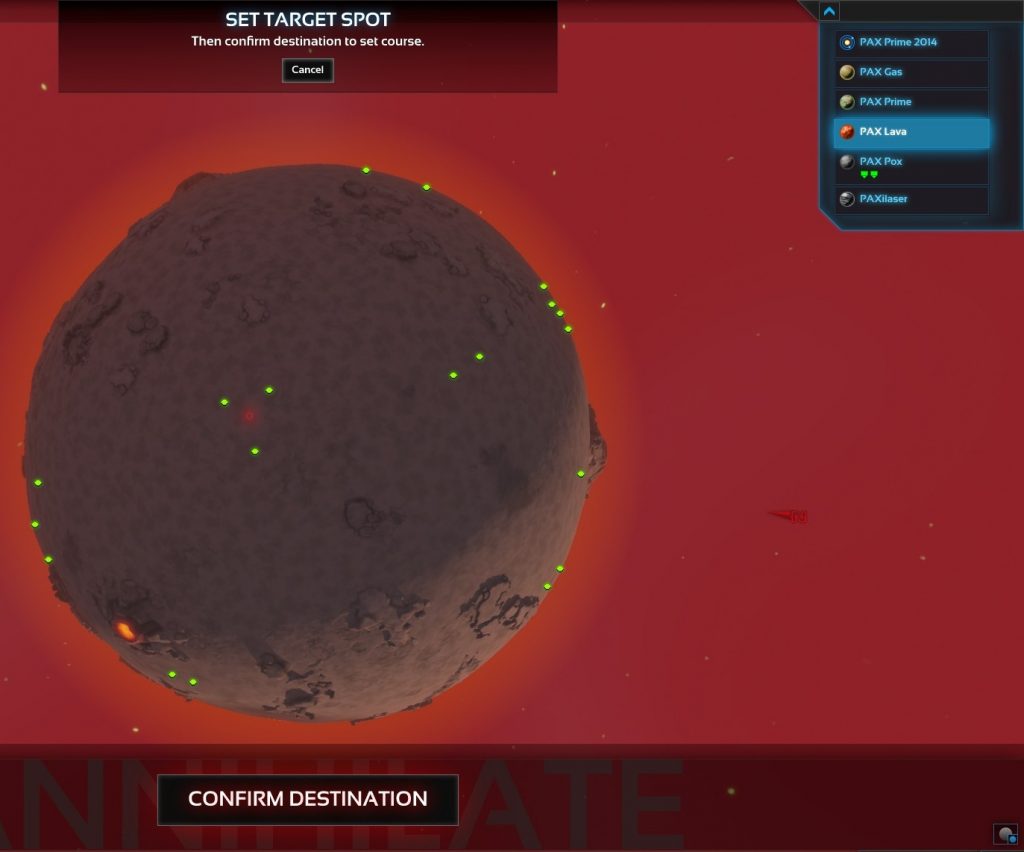
This is the first thing you’ll see when entering a game: a full view of the system. Note that two planets have a numbered arrow pointing to them and that in the top right system list three of the planets have a green icon. The green icons represent planets players can start on, while the numbered arrows represent the spawn options you have been assigned.
You then zoom in on the planets either by positioning your mouse over them and using the scroll wheel, or by clicking the planet in the system list.
To select a spawn location you click. Where you click within the spawn location determines where you land. Once you have selected your spawn location click Start Annihilation. After every player has made their selection, or after two minutes have passed, the game will start.
When playing with shared armies all players on the team see the same spawn locations, in all other modes every player gets unique spawn options. The AI selects spawns in the same way as you, if you have instructed it to spawn off-planet it will only do this if it has a spawn available on another planet.
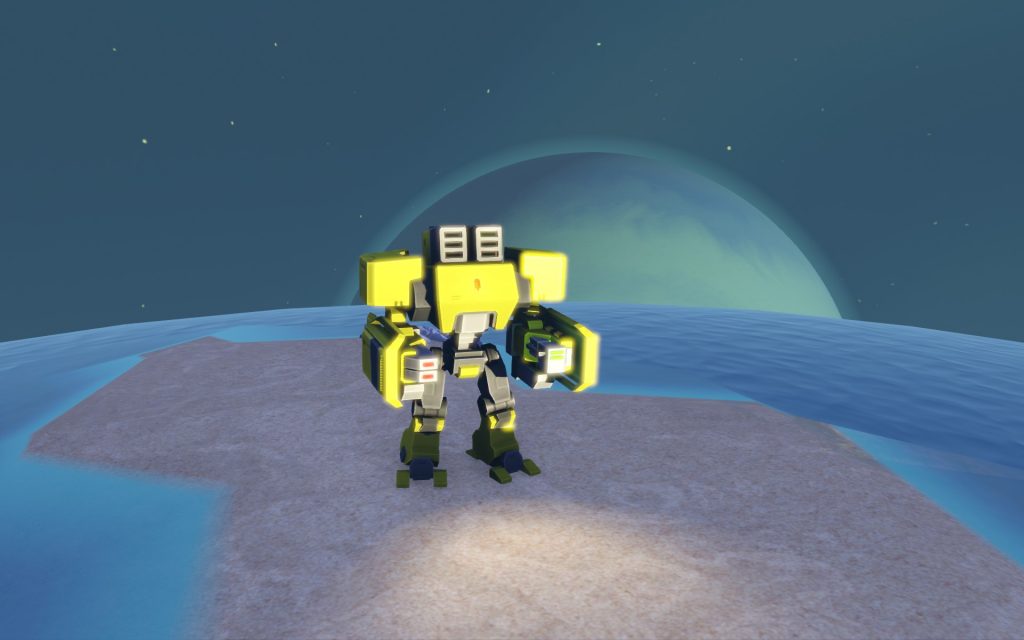
The Commander
The first thing we see when we spawn is our Commander. This is the key unit in Planetary Annihilation; lose your Commander, or in shared army mode lose all your Commanders, and you are out of the game. It doesn’t matter how big your base is, if the Commander dies everything else dies too.
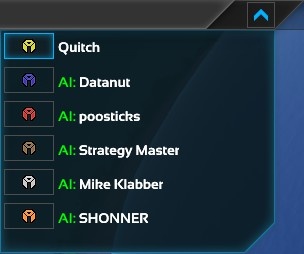
Players
In the top left is a count of the players and if we click it on we can see a list of who is playing. Any names in red indicate annihilated opponents.
Shared armies are represented by a single icon with multiple names listed next to it. Unshared teams have their icons placed adjacent to one another in the list.
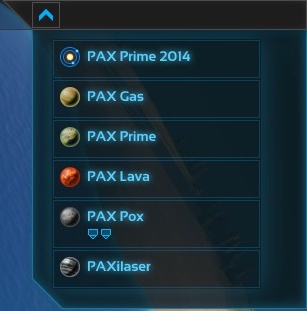
System
The system name and a list of planets can be found in the top right. Clicking on a planet switches your view to that planet.
Under some planets you may see little engine icons, this indicates that this planet is a smashable. Build as many engines, or “Halleys”, on the planet as are indicated by the icons and you will be able to select another planet to annihilate, destroying everything on both worlds.
Economy
Green is good
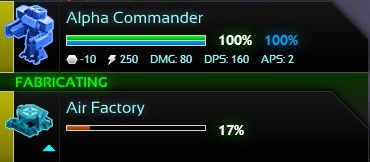
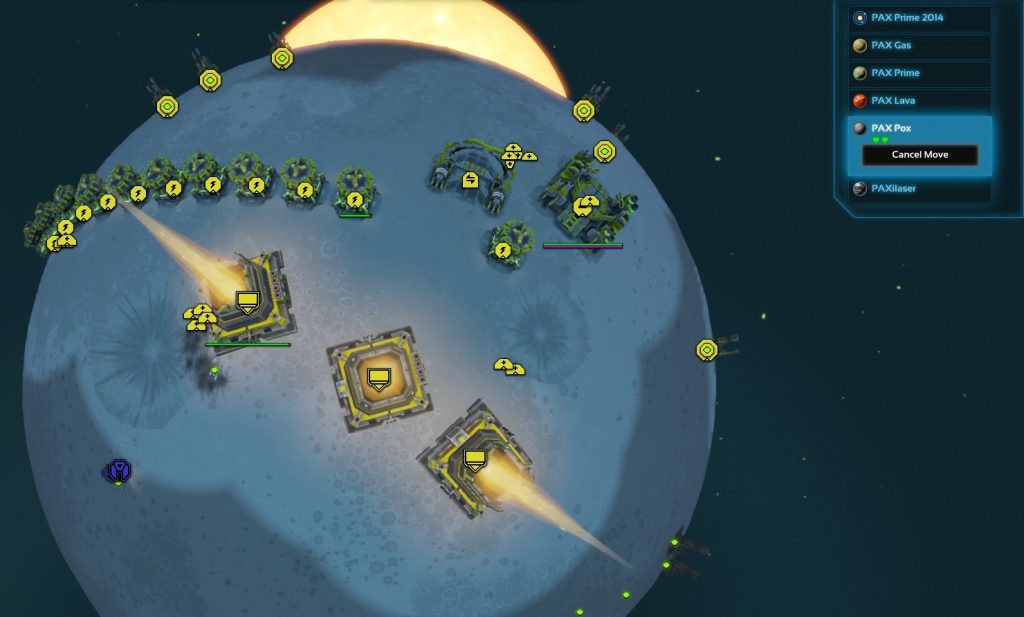
At the top of the screen is one of the most important parts of the game: the economy bar. On the left is your metal and the right your energy. The coloured bar and the numbers underneath represent the amount of the resource in storage against your total storage. The numbers to the right represent your incoming and outgoing amount of that resource, the top green number being income and the bottom red number spending. The large number on the right is the result of income minus spending.
In the centre is your overall efficiency which impacts the speed at which you build units and buildings. At 50% efficiency two fabricators or factories are building at the same rate as one fabricator or factory would at 100% efficiency. Fabricators are the construction units of the game.
Issue an order to the Commander to build something and you will see the number and colour of the bars change. Blue means you are earning more than you’re spending and your storage is full. Red means you’re spending more than you’re earning and your storage is empty or about to run out. Green is in-between the two and the colour they should ideally be most of the time.
Hovering over any unit which is currently building will show you how much it is costing you. The cost is always the same, regardless of what is being built. Likewise, buildings which generate metal or energy will show you how much they’re making. The green bar represents the health of the unit.
Planetary Annihilation operates using a flow economy, meaning that all units and structures are built over time and cost your economy the whole time they’re being built. For example, let us take a standard Fabricator Vehicle which builds at 10 metal a second for a cost of 1000 energy per second. It can build a Missile Defence Tower, which costs 300 metal. This means for an economy operating at 100% efficiency it would take the fabricator 30 seconds as 300 metal divided by 10 metal a second is 30. The total energy cost would be 30,000, that’s 1000 energy a second for 30 seconds. If your economy were operating at only 50% efficiency then the fabricator would only be building at 5 metal a second, but this would still cost you 1000 energy every second resulting in a total cost of 300 metal and 60,000 energy over 60 seconds. The higher the metal output of a fabricator or factory the faster it builds things.
Controls
When you select a unit you can give it context sensitive orders with the right mouse button. For example, if you right-click in an empty space with your Commander selected it will be issued a move command. Right-click on an enemy and it would get an attack command. A left-click deselects the currently selected unit. This works for factories as well, so you can setup orders for as the rollout, such as a default patrol for fighter aircraft. Selecting a unit will cause the orders bar to appear on the right and, if the unit is a Commander, fabricator or factory, the build bar at the bottom.
Left-click selects units and orders
Right-click to give orders to a currently selected unit
Left-click to deselect a currently selected unit or cancel a selected order
Let’s first talk about the controls on the orders bar.
Move is self-explanatory. You would generally use this when you want to move into a densely packed enemy area and the contextual command keeps changing to attack. When you order a group of units to move they will do so in a formation at the speed of the slowest unit. Units will continue to attack anything in range while moving. Use a CTRL-click to have units break formation and move as fast as they can. Units issued a move command after being ordered to attack a target will continued to attack that target specifically until unable to do so, allowing you to dodge Uber Cannon blasts from a Commander while still shooting it and not other units in the vicinity.
Attack allows you to perform attack moves whereby units will move to a location but stop to attack anything along the way. Also used to cause a nuke to attack a ground location. Unlike many other RTSs your units can attack while moving and therefore a move command will often suffice unless you have a particular reason to maintain your unit’s full range. Units on an attack command will not maintain formation and will move independent of one another. If you issue an attack command against a specific unit, your units will treat it as a priority target even if you issue a subsequent command.
Alt Fire exists only for the Commander and controls its Ubercannon. This is a short-ranged, energy expensive attack that will devastate enemy units. It is much less effective against buildings and enemy Commanders.
Assist is similar to the guard command seen in other games. A unit will follow the unit it is assisting, protect it from harm, and help it build things if possible. Fabricators can help factories build faster in this way.
Repair allows fabricators to heal units and buildings. Fabricators will automatically repair units they are assisting.
Reclaim is used by fabricators and combat fabricators to suck up units, buildings and trees. Metal will be reclaimed over time. It can also be used against enemy units. It’s not uncommon to use combat fabbers to power a so-called treeconomy.
Patrol forms a patrol route based on the patrol orders you lay down. The first patrol order acts as the beginning and end of the path. Fabricators will automatically repair, reclaim and assist anything they come across.
Use is for particular buildings like the Teleporter. You should never need to select this from the orders bar, it can always be issued as a contextual command via the right-mouse button. The only exception to this rule is using enemy teleporters where you will need to issue the order manually. Units will not fire on an enemy teleporter they have been ordered to use.
Unload is for transports to unload their cargo. If you’re moving a unit between planets using Astraeus transport then you need to issue the move order to the other planet first and queue the unload afterwards.
Load is for transports to load their cargo. Note that Pelicans cannot carry Commanders.
Stop cancels everything that unit or building was doing.
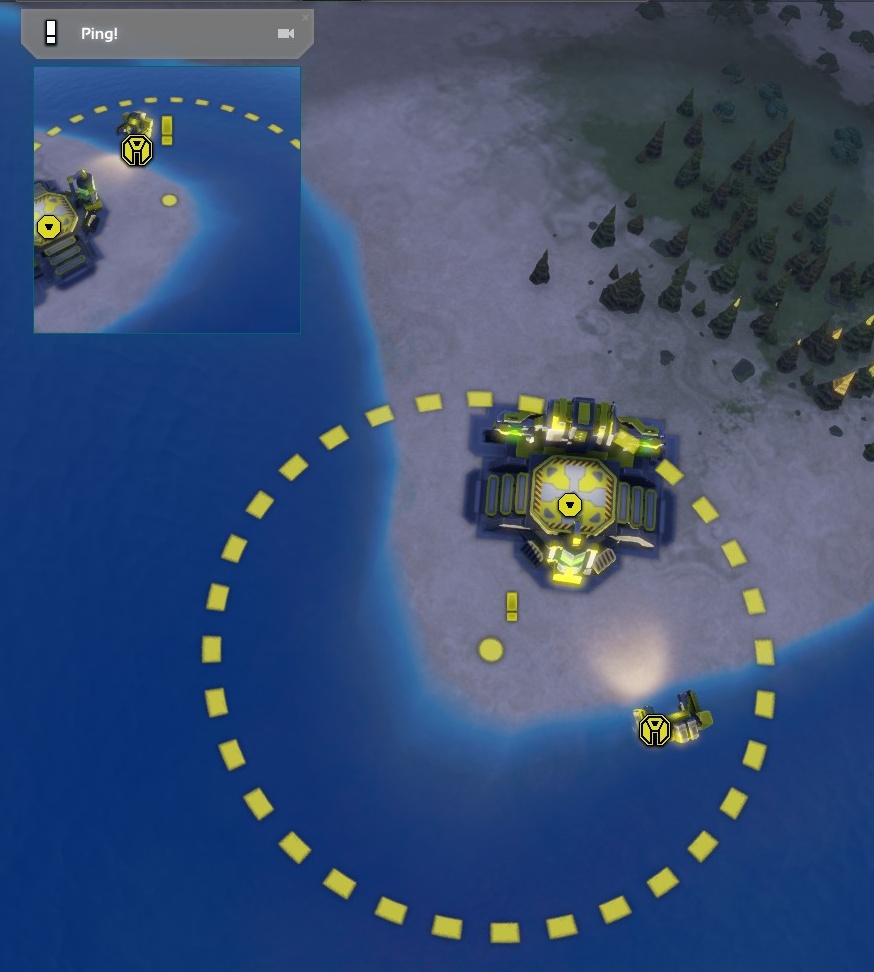
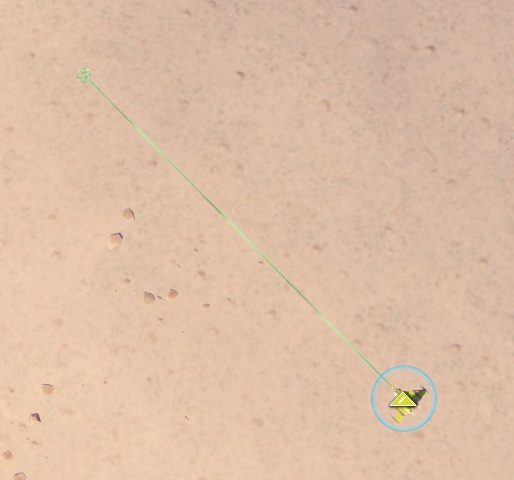
Ping is found not on the orders bar but at the bottom of the screen by the clock. It is available at all times and forms a ping your teammates and spectators can see. Notice how a ping creates an alert at the top of the screen. Hovering over the alert provides a view of the area, and clicking the alert takes you to the alert location. Other events, such as the loss of a building or an attack on the Commander will also generate these.
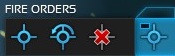
Fire orders allow you to control when a unit will open fire. The icon changes depending on the order selected.
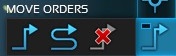
Move orders currently serve no purpose. The icon changes depending on the order selected.
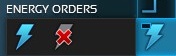
Energy orders are used to pause factory queues or disable energy expensive units as required. The icon changes depending on the order selected.
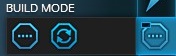
Build mode is a contextual order for factories. Changes between normal and continuous modes. This determines whether completed units are removed from the queue or moved to the back of the queue. The icon changes depending on the mode selected.
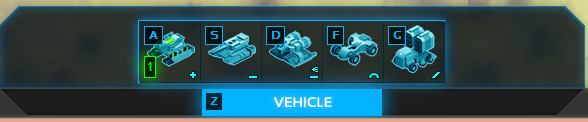
Build Bar Commands
The build bar appears only for fabricators and factories. Fabbers will display the structures they can build, factories display the units they can build.
Fabbers
For a fabber you left-click the unit you want to build then left-click on the map to give the fabber an order to build it in the selected location. To build multiple items hold SHIFT each time you click to place an item on the map. This allows you to create a queue of build orders, and you can even mix in other orders between the build orders using this method.
Factories
The build bar for factories will show the currently queued units. While in normal build mode the number of units queued will decrease by one each time the factory starts building another unit. For example, once a factory with two fabbers queued starts to build a fabber it will reduce the fabber number from 2 to 1 to indicate the size of the queue remaining. In continuous build mode the factory will loop through the queued units and the numbers displayed will not change. There will not be an indication as to where in the queue it currently is.
The stop command can be used to cancel any currently building unit and to wipe the queue.
Units added to the queue before the enabling of continuous build mode are removed from the queue upon completion per normal build mode.
Advanced Commands
SHIFT-click increases units in increments of 5.
CTRL-click puts that unit at the front of a factory’s queue and excludes it from any continuous build queue.
Units queued prior to continuous build being enabled are excluded from the continuous build.
Take a newly built factory as an example: you click on the Ant twice, turn on continuous build, shift-click the Ant, click the Spinner, CTRL-click the fabber. This would result in the following:
An Ant is produced (as the factory was inactive it started building immediately)
A fabber is produced (CTRL-click put it at the front of the queue but didn’t interrupt the currently building Ant)
Six Ants are produced
One Spinner is produced
Five Ants are produced (one less because the sixth Ant was queued in normal build mode)
One Spinner is produced
etc.
You could use CTRL-click to build additional fabbers in the future without compromising the build queue, or causing large numbers of fabbers to be produced.
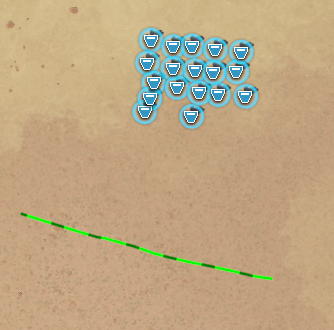
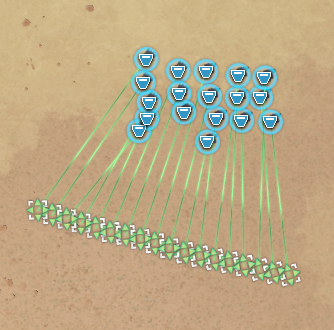
Area Commands
The game provides you the ability to issue commands over areas rather than simply at individual points. Select an order, such as patrol, then click and drag. You can do this with orders for units or even factories. Below are shown some examples:
Area move – line formation
Area move – execution
Area patrol
Area build – metal
Area build – circle
Area build – line
Area commands, such as patrol, when dragged beyond the planet will now encompass the entire planet. You can use this to, for example, have aircraft patrol an entire world, or build on every metal spot.
Surrendering
It’s considered poor form to just disconnect from a game. Instead you should surrender. Press the escape key to bring up the menu and choose surrender, or select your Commander and press delete.
You should not use the quit function to exit a game.
Pausing
Press the escape key and select pause from the menu. You can issue orders while paused but build and order previews will not update while pause is active.
If your opponent pauses it is good etiquette to check that they are ready to resume play before unpausing.
Picture-in-Picture (PIP)
One of the unique features of Planetary Annihilation is picture-in-picture. The PIP allows you the exact same functionality as the primary window, you can view anything or anywhere, give orders, etc. Hovering over this window reveals four more functions:
Swap cameras causes the PiP view to swap with the view of the main camera.
Capture main view clones the current view in the PiP.
Follow alerts means the PiP will switch view to whatever the latest alert to appear is.
Pin to opposite side will have the PiP view the opposite side of the planet you are viewing. Note that this still does not give you 100% visibility of the planet.
Chronocam
Another unique feature is the Chronocam, which allows you to look into the past, even during a live game. Grey bars represent alerts.
Closing the Chronocam takes you back to the present.
Planet Smashing
The feature that Planetary Annihilation derives its name from. Build as many Halleys on a planet as indicated by the engine icons next to the planet and you will see a new button in the system list. If the planet has no icons then it cannot be powered by Halleys.
Be aware that all players are notified every time a Halley is built and are given its location.
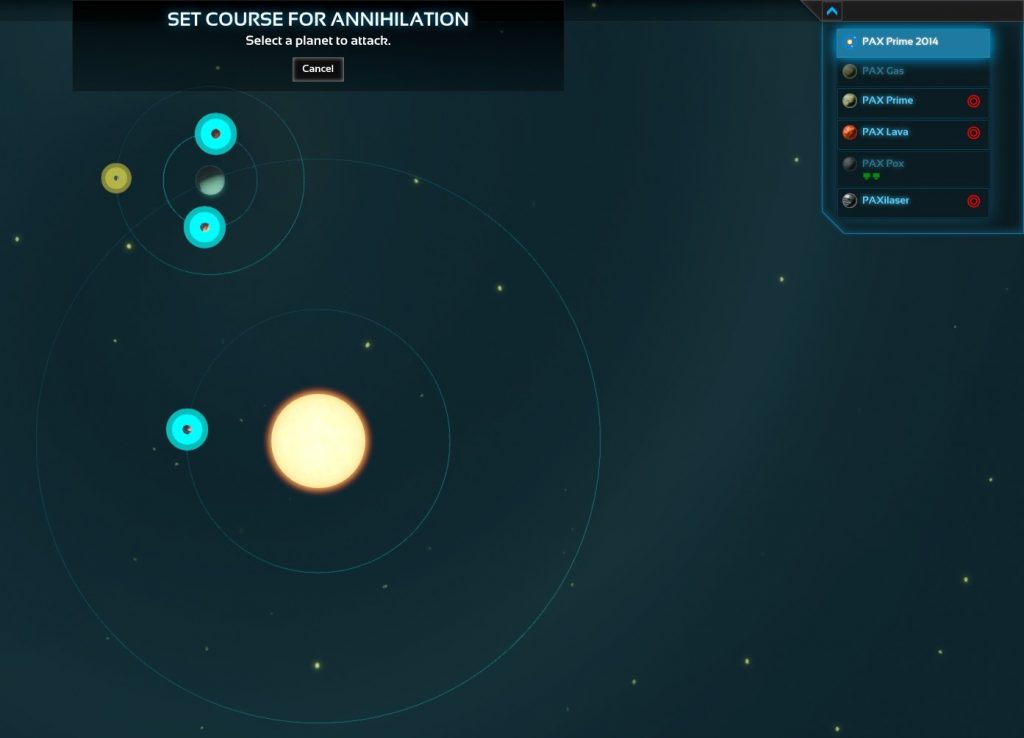
Clicking it will zoom your view out to see the entire system. Potential targets will have a new icon next to them.
Click the planet you want to annihilate. The view will now switch to the surface of the planet and you will be asked to click the location you want to come down on. Once you have done that click the final button.
Once clicked the engines will light up and away it goes.
If you cancel the move then the planet will settle into an orbit wherever it stopped. The same will happen if one of the engines is destroyed. A planet enroute to smash another planet cannot be targeted by nukes.
Be aware that if another planet gets in the way of the smash it will be smashed instead. In heavily populated systems you will need to monitor a planet’s smash route.
Once a planet has been smashed any bodies it had orbiting it will now commence their own orbit around the sun. If their orbit causes them to run across the path of another planet then the collision will be treated the same as a smash. Be wary of the chain reactions one smash can cause in a system.
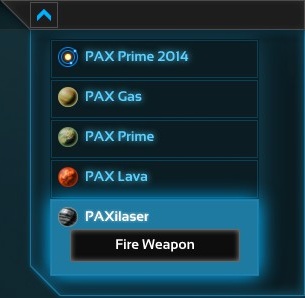
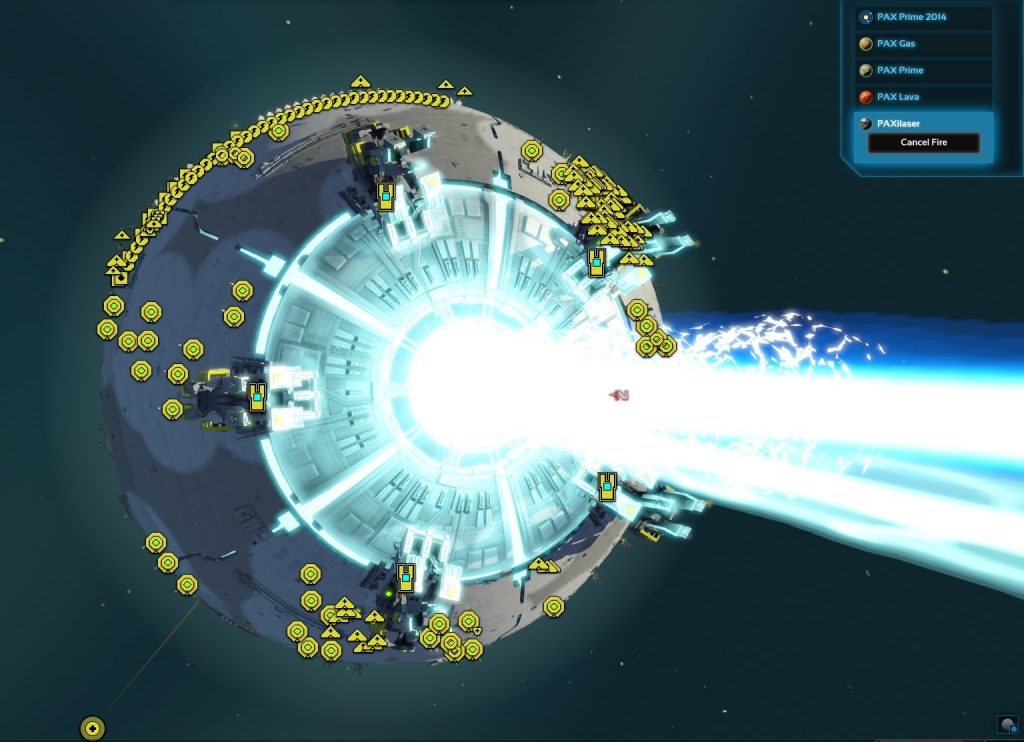
Annihilaser
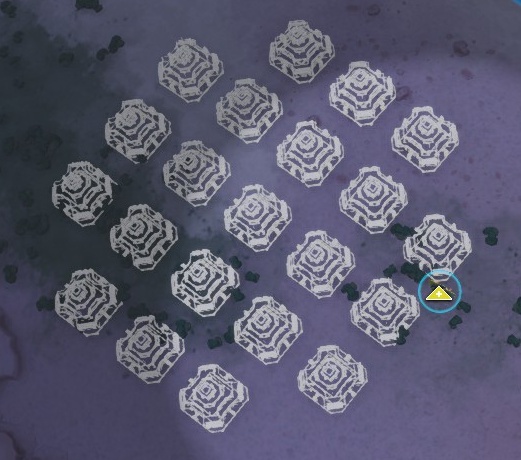
To fire the Annihilaser you must build five Catalysts using T2 fabbers on the blue control points found on any metal planet. These can be fiddly to place, so use area build to construct them. You must also ensure that any metal spots near the control point are empty.
Be aware that every player is notified every time a Catalyst is completed and are given its location. A planet smash near the pole will permanently destroy the control nodes and prevent the Annihilaser being used.
Once your weapon is ready to fire the system list will have a new button present.
Click it and pick a target.
The Annihilaser will align the weapon, and then…
You can cancel the attack if you want, but why would you?
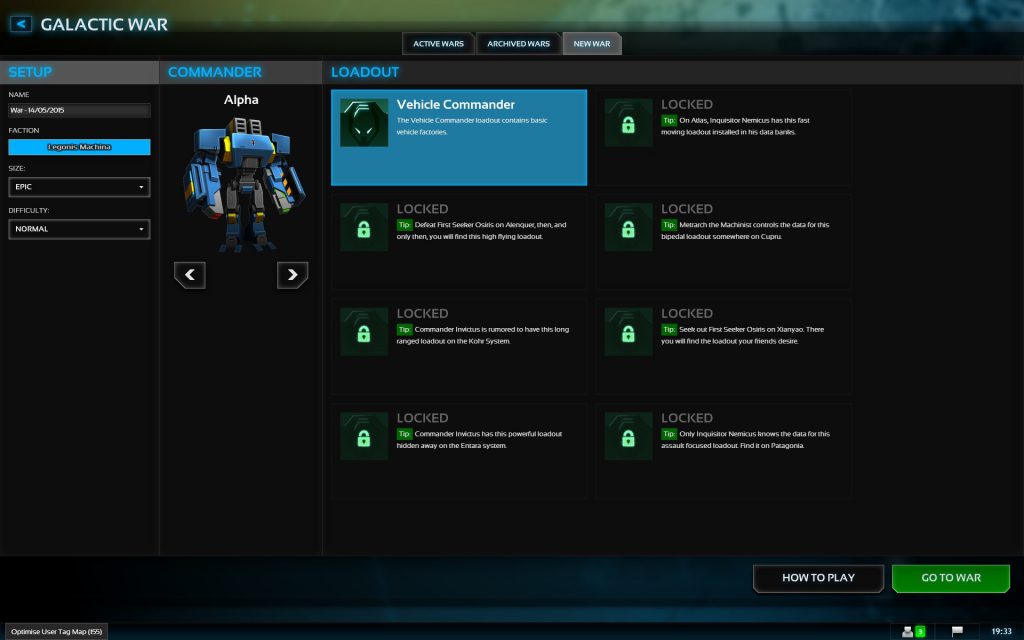
Galactic War
This is Planetary Annihilation’s randomly generated single-player campaign. You start out with almost no tech and must fight your way across the galaxy defeating enemies and gaining more technology. Victory is obtained when you eliminate the three enemy faction leaders.
On the setup screen you select your commander and faction, both of which are cosmetic elements only. You can also name your game for later access.
The Size setting determines the size of the galaxy you will play in. A larger galaxy means a longer game, it also generally means an easier one as you will have more opportunities to collect tech ahead of battling a faction leader.
The Difficulty controls how quickly the AI ramps up in difficulty in terms of AI difficulty level, number of commanders and economic multipliers.
The Commander Loadout controls what technology you start the game with. You will unlock additional loadouts over the course of your Galactic War games.
Global Game Settings
You can access these settings from the main menu.
Graphics
Most of this is self-explanatory, but there is one setting I want to explain: Resolution Scaling.
Planetary Annihilation will always run at your desktop resolution, but by changing this option you can control the resolution 3D objects are rendered at. For example, if you’re running at 1920×1080 and change this setting to 125%, all units are now being rendered with a resolution of 2400×1350 before being downscaled for your output resolution, leading to a higher quality image at the expense of performance.
Audio
This is all self-explanatory.
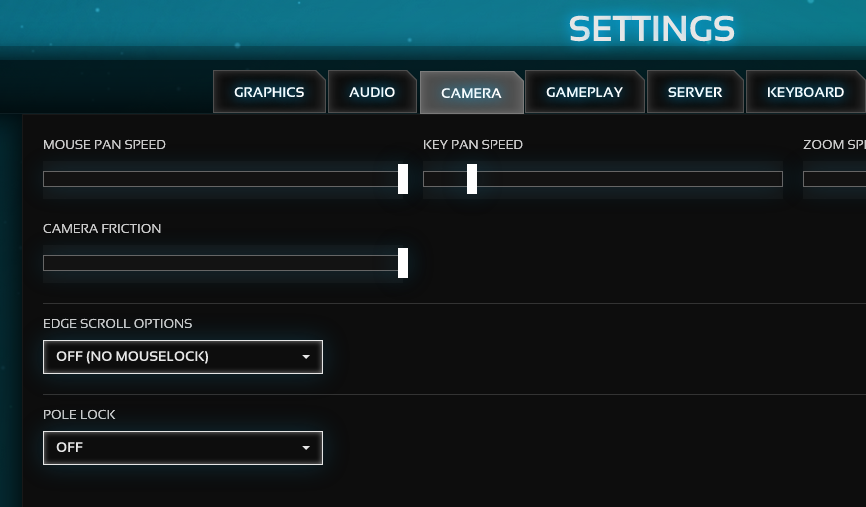
Camera
The camera is controlled either by keys configured in the Keyboard area, or by holding mouse button three (also called middle mouse button) and dragging.
Once in-game you’ll notice that as you move the camera about the planet that the north and south poles shift in relation to the screen. While this is the optimal way to play the game it can be incredibly disorientating. We don’t get straight onto a two wheeled bike, we first start with stabilisers. That’s training wheels for US folks. Planetary Annihilation has these stabilisers in the form of Pole Lock.
Switching this option on will ensure that north is always at the top of the screen and south is always at the bottom. Now, this is a sub-optimal way of playing for a couple of reasons: it gets you thinking about attack lines only from the east and west because that’s how you rotate the map and it makes it much harder to navigate around the poles, which can thus discourage you from spawning there or making any plays around them. However, despite this you’re going to have a lot to be learning at first so not having to fight camera disorientation can be helpful during this period. Indeed, I used Planet Pole Lock for the first few weeks of playing.
Gameplay
Active Product controls whether you’re hosting Titans or Classic games. You can always join other players’ Classic games regardless of this setting.
GUI Size controls the size of the user interface, useful for adjustments on extremely high or low resolution displays.
Show Unit Icons controls the strategic icons that appear over units so you can control them even at extreme zooms. Personally I recommend setting this to “always” as icons are much easier to make out than the units themselves.
Show Metal Spot Icons controls the display of green dots over metal spots. You will always want this on.
Icon Display Distance controls how far out you must zoom before unit icons are shown.
Show Stat Bars controls when unit health bars are shown, as well as the small white indicators used for recharge times of energy dependent units such as your bombers. You should probably leave this on.
Show Order Previews controls whether or not you see arrows between a unit and its destination. These arrows will change in colour based on the order, so green for move and patrol, red for attack or reclaim and blue for assist . It will also show the end point of a command, so a movement symbol at the end of a movement path, or an assist system on a unit being assisted.
Note that the final movement of patrol loop is not shown until a unit reaches the first patrol node.
Order Preview Behaviour controls whether order previews are show for all units or only the selected ones.
Show Build Previews controls whether you see wireframes for buildings queued for construction.
Build Preview Behaviour controls whether you see all build previews or only those of the selected units.
Orbital Shell controls when the green orbital layer is displayed around a planet to assist with orbital navigation. Selected means it appears when you select an orbital unit.
If you have the Legion Expansion mod for Titans installed you will also see the following options:
Theme In Game controls whether the red theme is used in-game when playing as Legion, and purple theme when playing in a mixed faction shared army.
Theme Menu controls whether the red theme and Legion background is used across the various menus. Changing this won’t take effect until you return to the main menu.
Servers
Server should be set to the region closest to you. It does not restrict who you can play with.
Local Server controls whether single-player games are hosted on your machine or on an public PAnet server. Auto will make a determination based on your hardware specs.
Local Server Multi-Threading allows the server AI and simulation to run across multiple CPU threads allowing for better performance.
Keyboard
I recommend you take the time to go through all these bindings and identify which are important to you, but I am going to draw your attention to a few of them:
General > Communication > Team Chat (enter) – In a FFA this allows you to talk to all players, while in a team game it would let you talk to your team only. All chat is white and team chat is yellow.
General > Communication > All Chat (shift-enter) – In a team game this allows you to talk to all players. In FFAs you can use either this or the Team Chat key.
General > Alerts > Ping (G) – This allows you to draw the attention of other players on your team to areas on the map. After pressing the key to select ping you then click where you wish to place the ping.
Units > Unit Selection > Select Commander (ALT-C) – Will select your Commander, and if pressed twice will take you straight to it. Do not use this key in shared army games as it will select all the Commanders.
Units > Unit Selection > Select Idle Fabbers (F) – Selects all idle fabbers on the screen for easy identification.
Units > Unit Selection > Select All Idle Factories (SHIFT-F2) – Use this to avoid having factories doing nothing. It will select them while they’re being constructed too.
Units > Unit Commands > Alt Fire (D) – Use this to fire the Commander’s Uber Cannon.
Dev Mode > Build Avatar (ALT-F1) – Use this in conjunction with Paste Unit (CTRL-V) to summon the Avatar in sandbox games. The avatar can build any unit and can be a great way to experiment.
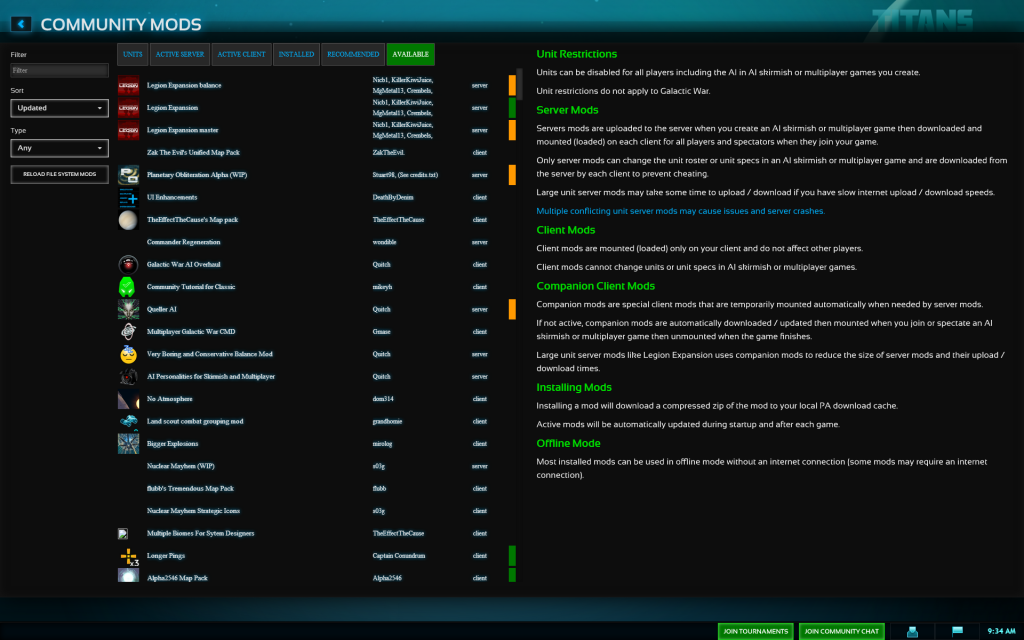
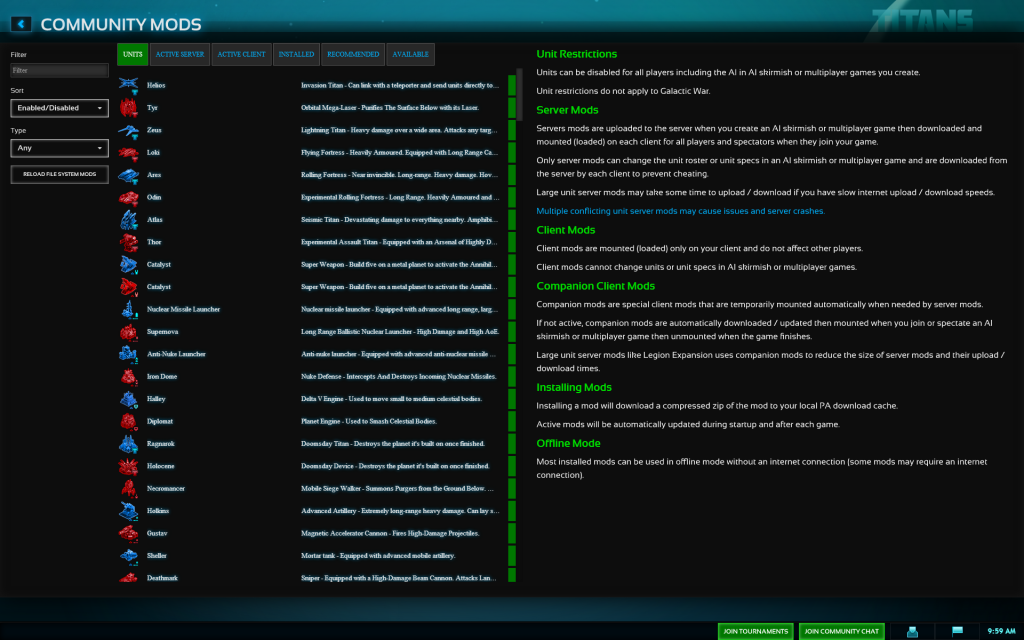
Community Mods
Use the Community Mods button on the main menu to access all the mods available for the game. The Recommended tab provides you some mods to get you started, while Available shows every mod ever made.
Mods are divided into two types: client and server.
Client mods only impact your local client and can be used in all games, including ranked games. Hotbuild 2 is an example of a client mod.
Server mods impact all players and only those of the original host of a game are applied. Anyone joining your game will automatically download and apply your enabled server mods. The Legion Expansion is an example of a server mod. Any active server mods are shown in the bottom-left of the lobby window.
The Units tab allows you to enable/disable units. Don’t like nukes? You can switch them off. These restrictions will work in both skirmish and multiplayer games. You will need to be the original lobby host for your restrictions to apply.
Active unit restrictions are always displayed in the lobby chat when you join.
THE GALAXY WON'T CONQUER ITSELFGet it now on Steam!